

HOW TO: Manage plugins in WordPress
How To Manage Plugins on WordPress Dashboard (In Details)
Before you start installing plugins for your blog, it’s important for you to explore the Plugins page on your WordPress Dashboard and understand how to manage the plugins after you install them. Click the Installed Plugins link in the Plugins menu on your WordPress Dashboard to view the Plugins page.
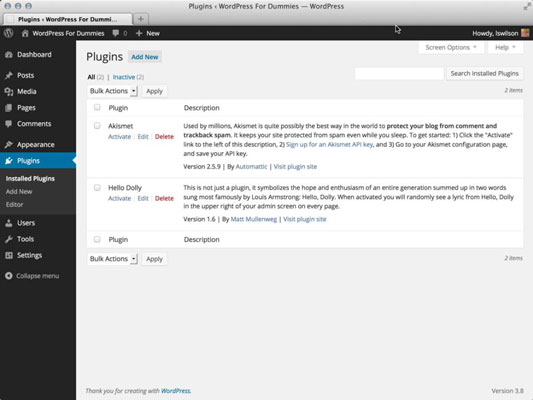
The Plugins page is where you manage all the plugins you install in your WordPress blog. By default, the Plugins page displays a full listing of all the WordPress plugins you currently have installed. You can filter the listing of plugins using the links shown directly below the Plugins page title:
All: This is the default view for the Plugins page and shows a listing of all plugins currently installed on your WordPress website, whether they are active or not.
Active: Clicking this link shows a list of the plugins that are currently activated and in use on your WordPress website.
Inactive: Clicking this link changes the display and shows the list of plugins that are installed but not currently active. (Note: This link displays on the Plugins page only if you have inactive plugins.)
Drop-Ins: A very select few plugins actually have files that change the behavior of WordPress so substantially that it lets you know about it. These plugins drop files into the wp-content directory that modify the core settings of WordPress. These files don’t show up in the main plugin listing because they typically belong to other plugins. The Drop-Ins link appears only if you have drop-in plugins installed.
Quick glance at Plugins page
On this page, you can easily tell which plugins are active and which aren’t by the background color of each plugin available. A blue background means that the plugin is not active. A white background means that the plugin is active.
You can mass-manage your plugins on the Plugins page. You can deactivate all your plugins simultaneously by selecting the box to the left of each plugin name and then selecting Deactivate in the Bulk Actions drop-down menu at the top or bottom of the page. Then click the Apply button.
Likewise, you can activate, upgrade, or delete the plugins listed by selecting Activate, Update, or Delete in the Bulk Actions drop-down menu. To quickly select all your plugins with one click, select the box to the left of the Plugin heading on the Plugins page.
Plugin details
The Plugins page displays plugins in two columns, which give details for each plugin:
Plugin: This column lists the plugin name so that you can find it easily when browsing the Plugins page. Directly beneath the plugin name, you see a few links for easy plugin management:
Activate: This link appears below the title of only inactive plugins. Click the link to activate a plugin.
Deactivate: This link appears below the title of only active plugins. Click the link to deactivate a plugin.
Delete: This link appears below the title of only inactive plugins. Click the link to delete the plugin from your site.
Edit: This link appears below all listed plugins, whether they are active or not. Click the link to visit the Edit Plugins page. If you feel comfortable doing so, you can edit the individual plugin files.
Final Wrap
Sometimes, a plugin will have a separate settings page; in that case, an additional link labeled Settings is displayed underneath the plugin name. Clicking that link takes you to the settings page for that plugin.
Description: This column lists a description of the plugin. Depending on the plugin, you may also see brief instructions on using the plugin.

