

A web robot’s primary job is to scan websites and pages for information. They work tirelessly to collect data on behalf of search engines and other applications. For some, there is good reason to keep pages away from search engines. Whether you want to fine-tune access to your site. Or want to work on a development site without showing up Google results. Once implemented the robots.txt file lets web crawlers know which parts they can collect information.
Creating a Robots.txt File
As being one of the first aspects analyzed by crawlers, the robots.txt file can be implemented on a page(s) or an entire site. To discourage search engines from showing details about your site. Through this article, we will be providing insight into how to use the robots.txt file as well as the syntax needed to keep these bots at bay.
User-agent: *
Disallow: /
Let’s break down the code below “user-agent” pertains to the web crawlers and the * sign means all web crawlers. Consequently, the first line grabs attention by saying “Listen up all web crawlers!”. We move onto our second line which lets the web crawler know its direction. The forward-slash (/) stops the bots from searching all the pages on your site. You can also discourage information collected for one specific page, in this case. it is a map of our building layout. Since the design of our building does not need to searchable, with the command below. I can tell all bots to leave out the index of the buildinglayout.png photo while keeping it viewable to any guest that wants to view it.
User-agent: *
Disallow: /buildinglayout.png
Contrary, if you would like for all search engines to collect information on all the pages in your site you can leave the Disallow section blank.
User-agent: *
Disallow:
There are many types of web crawlers (aka user-agents) that can be specified. Below is a chart of the most popular web crawlers followed by their associations. Furthermore, you can also instruct these bots to index a certain page by using Allow. shown in the example below. You can implement these web crawlers within your robots.txt file like so:
User-agent:Googlebot
Allow: /parkinglotmap.png
Disallow: /buildinglayout.png
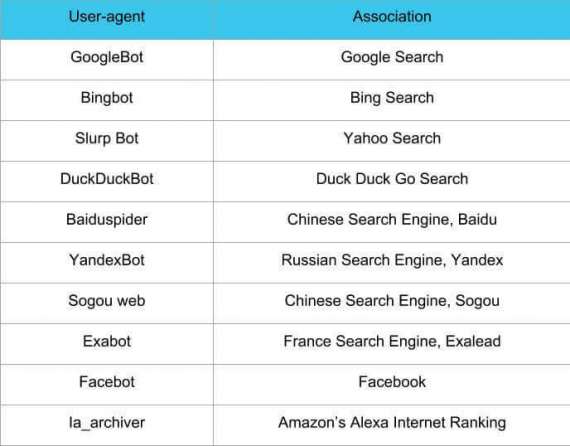
Crawlers table
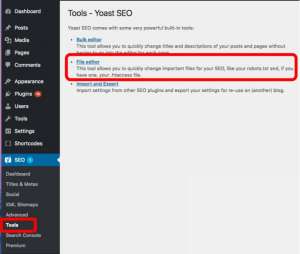
Mostly, sites don’t automatically come with a robots.txt file (and isn’t required) so you can create one using a text editor and upload the file to your root directory or any other directory. Luckily, if you use the popular CMS, WordPress, and its helpful SEO plugin Yoast, you’ll see a section within the admin window to create a robots.txt file.
Robots.txt File In WordPress
After logging into your WordPress backend (yourdomain.com/wp-login.php) locate the SEO section and select Tools.
After clicking on the file editor link, you see a page that looks similar to the code used in the first of our article.
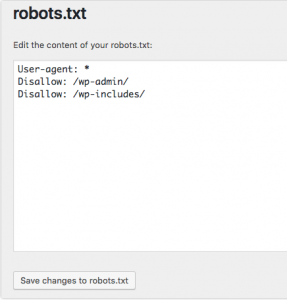
Our example keeps web bots from the WordPress login page, including the wp-includes directory while still allowing users and bots to see other pages of our site. Take note of the necessary ending slashes after the directory (but not needed when disallowing pages). After editing select the “save changes to robots.txt” button to activate the robots.txt file.
Click to read the article: Common HTTP errors and how to troubleshoot them

