

How to Connect Your Windows VPS via Remote Desktop
- Click the start button and search for “Remote Desktop Connection” and click the Remote Desktop Connection icon.
- After the Remote Desktop Connection windows are open, click the ‘Show Options’ button.
- After that, enter your IP address/port number and username in the blank field.
- Click ‘Connect’. A ‘Windows Security’ window will popup.
- Then, enter your password. If you want to save your password, tick the remember me checkbox.
- A warning pop up will show “The certificate is not from the certifying authority”. This is because the IP address is not in the coverage of an SSL certificate. Just click ‘Yes’.
- Now, you are successfully connected to the Windows VPS.
For more clear instructions, watch our tutorial video on Youtube.
How To Use Remote Desktop To Access Your Windows Server’s Desktop From Anywhere In The World
On a normal Windows computer, you have a keyboard, monitor, and mouse that allow you to interact with the machine. For Windows VPS servers hosted on the Internet, things are a bit different because your server could physically be thousands of miles away. To access the desktop of an Internet-hosted server, Microsoft has created a feature known as Remote Desktop.
Please note that this article pertains only to those who have a Windows server.
Which Operating Systems are Supported?
All Casbsay Windows servers are capable of Remote Desktop. However, not all client computers can use it. Here is a list of operating systems known to be capable of communicating with your Windows server with Remote Desktop: Microsoft Windows 2000 Clients and Servers, Microsoft Windows XP Professional, Microsoft Windows 2003 Server, Microsoft Windows Vista Ultimate and Business Editions, Microsoft Windows 2008 Server, Microsoft Windows 7 and later, Linux with the RDesktop application installed.
Mac OS X with a Remote Desktop client: (Mac OS X versions 10.9 and later: Microsoft Remote Desktop), (Mac OS X versions 10.5-10.8 only: Open Source CoRD Client), (Mac OS X versions before 10.7: Microsoft Remote Desktop Connection Client for Mac)
Remote Desktop from a Windows Computer
- Click the Start button.
- Click Run…
- Type “mstsc” and press the Enter key.
- Next to Computer: type in the IP address of your server
- Click Connect.
- If all goes well, you will see the Windows login prompt.
Remote Desktop from a Linux Computer with RDesktop
- Open a command shell using xterm
- Type ‘rdesktop‘ at the command prompt to see if you have rdesktop installed
- If rdesktop is installed, then proceed. Otherwise, you will need to install the rdesktop package for your flavor of Linux.
- Type ‘rdesktop‘ followed by your server’s IP address. Then press Enter.
- Example:
$ rdesktop 72.52.246.40
- Example:
- If all goes well, you will see the Windows login prompt.
Remote Desktop from a Linux Computer with RDesktop
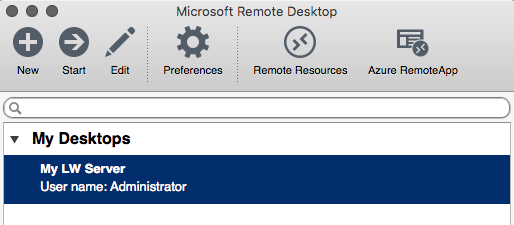
1. Using Microsoft Remote Desktop (Mac OS X versions 10.9 and later):
- Install Microsoft Remote Desktop from the Mac App Store.
- Click the New button or use the shortcut Command + N to set up a connection to your server. For the setting details, please contact us for more information.
- PC name: You can use your server’s IP address or its hostname (if the hostname has an appropriate DNS record and resolves it).
- Username: To access the admin account, use “Administrator”.
- Password: Enter the Administrator password.
- Configure full-screen and multi-monitor settings to your preference.
- Once you’ve filled in the appropriate settings, close the Edit Remote Desktops window.
- Select your connection under My Desktops and press the Start button in the menu to connect (or simply press the return key on your keyboard).
- If your server uses a self-signed SSL certificate, a message will be displayed as Remote Desktop is negotiating credentials. You can either press Continue to proceed with the connection or, to permanently store the certificate and connect directly in the future, click Show Certificate and then check the box next to Always trust … before clicking Continue to proceed.
2. Using CoRD (Mac OS X versions 10.5 through 10.8 only):
- Download and install the CoRD application
- Open the application and click on the File menu, then New Server
- You will be presented with a window where you can specify information about the server you are connecting to.
- Enter the server’s hostname or IP address in the Address field.
- You can alter the other settings in this window if you wish but all you need to start the connection is the address.
- When you are finished making changes, press the enter/return key on your keyboard or simply close the new server window.
- Your new server profile will appear in the list to the left side of the application. Double-click on it and you will start the connection to your server.
3. Using the Microsoft RDP Tool (Mac OS X versions before 10.7 only):
- Download and install the Microsoft Remote Desktop Connection Client for Mac.
- When you open the application, you will be prompted for the “Computer:” you would like to connect to. You can enter the server’s hostname or IP address.
- After you click Connect the client will ask for your user name and password. If it fails to connect, you can try again inside the remote connection window.

